Step-by-step guide to slide viewing
This guide to viewing microscope slides is written for beginners.
Understanding specimens as viewed by microscope involves two distinct tasks: Each of these tasks supports and reinforces the other.
- Learning about tissues -- stuff you can read in books.
- Interpreting tissue appearance -- stuff you see, whether by conventional microscopy or by virtual microscopy.
Reading about tissues lets you know what might be seen.
Seeing for yourself makes the reading more compelling and memorable.Before looking at any slide, you should have at least a rudimentary idea of how microscope slides are prepared.
While looking at any normal tissue sample, hold the the following ideas in mind:
- Everything you can see on a slide will be something whose name you already know (as long as you have read at least basic information about the specimen's source location).
This is a reliable statement, although occasionally some details may elude ready identification, even by experts. (Such details will nevertheless be stuff that you know -- sort of like being at a party where you know everyone but sometimes fail to recognize someone seen from behind.) Discrete structures (stuff that appears as layers or as noticeable "things") will almost always be something that is already conceptually familiar, even if you have not yet learned to recognize it.
- Everything you can see belongs to one of the four basic tissue types.
- Nerves (peripheral nerves are very common but usually inconspicuous).
- Muscle (if present, muscle is usually distinctive, with just a few variations on appearance).
- Everything else is epithelium or connective tissue.
- Epithelial tissue looks epithelial (typically boxy cells attached to one another).
- Connective tissue is commonly fibrous (mostly irregular pink-stained collagen) or fatty (empty-looking "bubbles" of fairly uniform size) or lymphoid (lots of small nuclei jumbled together).
- Distinctively organized patches commonly belong to one of the following categories. Each of these should become quite familiar through frequent encounters.
- Blood vessels.
- Ducts.
- Glands.
- Nerves.
- Muscle bundles.
- Skeletal elements.
- Everything should be context-appropriate. You only need to be looking for stuff that belongs in the specimen at hand; for example, you won't be seeing bone or cartilage in gut specimens.
Step-by-step:
The efficiency of the approach outlined below should increase as one acquires more detailed knowledge of tissue appearances. Some experience with various slides should soon make steps 1 - 4 fairly intuitive, so that attention can focus on step 5. Critical consideration of steps 6 and 7 will require substantially more training.
For virtual slides, you may skip step 2 below. Adjust microscope for optimal viewing (see how to use a microscope).
At lowest available magnification (this might be just an inverted microscope objective), take note of areas for further detailed inspection:
- natural (epithelially-lined) surfaces.
- edges cut by specimen acquisition.
- regions with different textures or colors.
Determine whether the specimen includes the surface of its source or comes entirely from within.
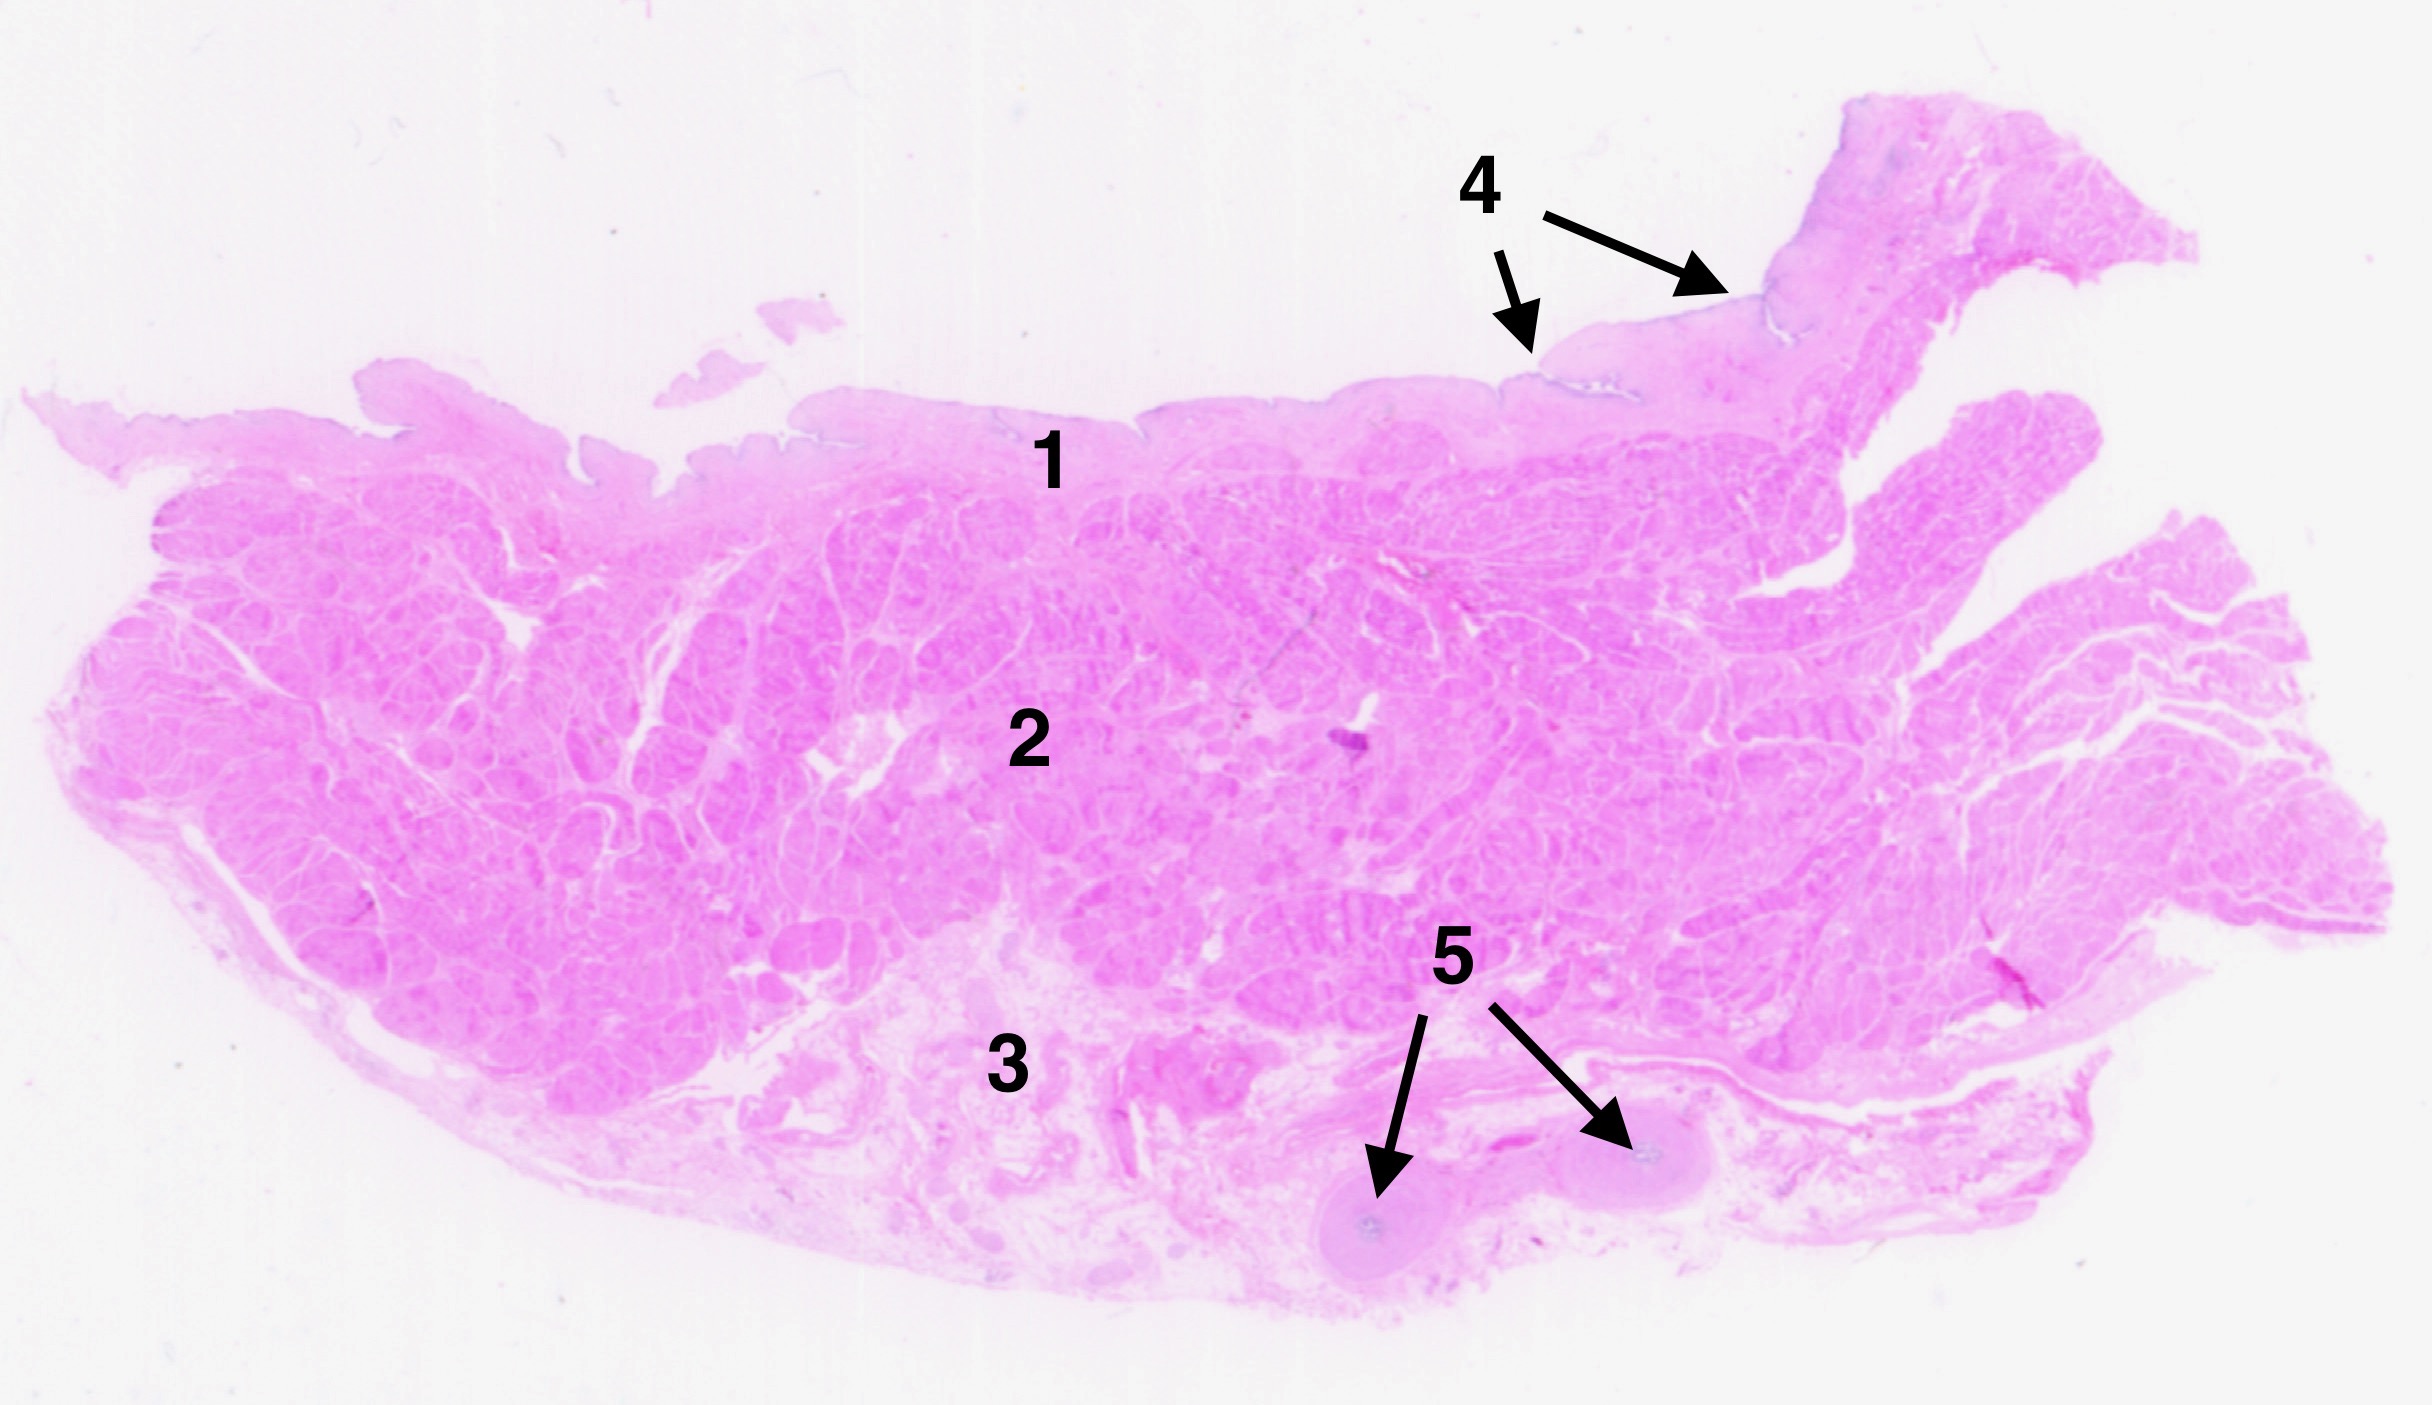
- If surface is included, note the tissue type of each layer (e.g., numerals 1, 2, 3 in example at right).
- If from within, note relative proportions of parenchyma and stroma.
At higher magnification (10x objective*; see asterisk below), examine each distinct region, layer, or tissue type.
- Note features characteristic of the source organ (e.g., numerals 2, 4, 5 in example at right).
- Also pay attention to commonly observed features, such as:
- lamina propria (numeral 1 in example at right).
- ordinary connective tissue (numeral 3 in example at right).
- blood vessels.
- lymphoid tissue.
- fat.
Beware of artifacts of specimen acquisition:
- post-mortem change, such as loosened or lost epithelium.
- distorted cells near edge of specimen.
- uneven fixation and staining, especially between center and edges of specimen.
- cell shrinkage and other fixation artifacts.
Look for evidence of pathology:
- inflammatory infiltrate (typically in stroma).
- cell death (e.g., swollen cells, loss of nuclei).
- scarring (collagen in place of normal parenchyma).
- atypical tissue architecture (e.g., metaplasia, dysplasia, neoplasia).
- more...
* Beginners may often prefer higher magnification (40x objective). However, shifting too quickly to a high-power objective makes it all too easy to become lost, or to miss important observations. For a practiced eye, a 10x objective is sufficient for appreciating most significant tissue features. A higher-power objective is used only to confirm particular details. There is even an aphorism in histopathology: "High-power objective for low-power pathologist; low-power objective for high-power pathologist."
More elaborate guidance (for beginners) on tissue interpretation can be found at Viewing sections.
Comments and questions: dgking@siu.edu
SIUC / School
of Medicine / Anatomy / David
King
https://histology.siu.edu/intro/begin.htm
Last updated: 21 December 2024
/ dgk