INTRODUCTION
A typical histological specimen is a very thin slice of tissue, mounted on a glass microscope slide and colored with intense stains.
Most fresh tissue specimens are colorless and squishy. They provide
little useful information. For scientific or diagnostic purposes, tissue
specimens must undergo substantial alteration in preparation for viewing under
a microscope.
Historical note: The development of histological knowledge closely paralleled developments
in technology for tissue preparation. The "Father of Histology," Marie-Francois Bichat (1771-1802),
established this field of study decades before development of modern histological protocols. Bichat separated tissues by
dissection; "where the scalpel was insufficient," he subjected his specimens to "desiccation, putrefaction, maceration, ebullition,
stewing, and the action of acids and alkalis"
(quote from Bichat's General Anatomy).
Nor did Bichat use a microscope.
There are four steps in standard tissue preparation.
- Fixation stabilizes and preserves the tissue.
- Embedding converts the tissue into a solid form
which can be thinly sliced ("sectioned").
- Sectioning (slicing) provides the very thin
specimens needed for microscopy.
- Staining provides visual contrast and may facilitate identification of specific tissue components.
The most common mode of routine tissue preparation involves fixation
with buffered formaldehyde, embedding in paraffin,
sectioning into slices about 5 micrometers in thickness,
and staining with hematoxylin and
eosin (H&E).
Modern cell biology uses many tools to reveal cell structures and functions
that are not apparent on such routinely prepared slides. Many
of these involve sophisticated reagents based on the specificity of enzymes,
immunological antibodies, or gene sequences to label and localize specific
proteins or other molecules.
Most basic histology texts offer a minimal account of basic histological
technique; some some may present additional detail. For routine examination of tissues, you probably don't need to know much more than what is offered on this webpage.
ARTIFACTS. Be aware that each step of tissue preparation introduces
artifacts by altering or distorting the natural appearance of cells.
Some artifacts are unavoidable. Fixation,
by its very nature, kills cells and stabilizes dynamic cell processes.
Enzyme activity is usually altered. Ions and small molecules
are usually washed away.
Some artifacts are intentional, most notably the
colors added by staining. The pink and purple
colors of H&E staining can become so familiar
that they appear "normal," as if they were the natural colors
of tissues.
Still other artifacts are accidental. Some of these are extremely common in any but the most painstaking procedures.
- Cells
may shrink or swell during fixation Cell shrinkage causes an
apparent increase in extracellular space, for example commonly forming a "halo" around blood
vessels (example) and nerve cell bodies
(example) in the central nervous system.
- Extracellular spaces may be distorted by compression or stretching.
- Lipid is usually extracted from adipocytes, leaving nothing to maintain the shape of the spaces where each lipid droplet once resided.
- Ripples and wrinkles can be introduced during cutting and handling
of sections.
Unintended artifacts can be minimized
by optimal procedures -- but optimal procedures are often impractical, especially
with post-mortem human specimens. Ideal tissue preparation
preserves cells in a form that resembles the living state, but this ideal
is seldom practical with clinical specimens. Often,
especially in post mortem (autopsy) material, cells have been dead
and deteriorating for several hours before fixation.
Therefore, certain artifacts must be appreciated as part of the normal appearance
of tissue specimens.
The process of cutting tissue slices can
introduce still other artifacts of sectioning.
FIXATION
Fresh tissue samples must be preserved for future examination. This
process is called fixation, and the resulting specimen is described
as fixed.
Boiling an egg and pickling a cucumber represent examples
of fixation, in which heat or chemistry stabilizes the organic materials.
Chemical fixation: A variety of chemicals can be used for fixing histological specimens. Routine
fixation often uses a solution of formaldelhyde (formalin) to react
with proteins and other organic molecules to stabilize cell structures. This
solution is buffered and osmotically balanced to minimize shrinkage, swelling,
and other collateral damage.
Ideally, fixation should be accomplished extremely quickly to minimize post-mortem
changes in cell structure. Since fixation rate is limited by diffusion,
ideal tissue preservation requires that fixative be delivered as closely as
possible to each cell. Rapid delivery of fixative can be accomplished
either by perfusion or by immersion.
Perfusion
involves the delivery of fixative through the circulatory system of living
tissue, by direct injection into a major artery. Such a procedure
is commonly used with experimental animals but is obviously impractical
for obtaining clinical specimens from living patients.
Successful fixation by immersion requires very small samples.
However, surgical removal of very small tissue samples often entails
incidental mechanical damage, especially with punch biopsies.
These constraints on ideal fixation mean that tissue quality
may vary across a specimen, with possible distortion near edges (especially
with needle or punch biopsies) and with variation in fixation quality (and
attendant staining character) in deeper areas (into which fixative diffuses
more slowly).
Freezing: An alternative to chemical fixation is freezing.
Chemical fixation and subsequent embedding take time and alter cell chemistry.
Sections from frozen specimens are seldom as "pretty" as well-fixed
specimens, but they do have certain advantages.
- A frozen specimen is already solid and so does not require
hours for the normal schedule of embedding. Thus sections from frozen specimens
can provide almost immediate diagnostic information to a surgeon in the operating
room.
- Frozen sections can also permit analysis of small diffusable
molecules or of enzyme activity whose presence would be lost during chemical
fixation.
EMBEDDING and SECTIONING
After fixation, tissue specimens are routinely embedded
in a solid material which will support very thin sectioning. (Frozen specimens
do not require embedding.)
To embed a tissue sample, tissue water is gently replaced first
by solvents such as alcohol followed by xylene. The solvent is then replaced with a material (the embedding medium), such as
melted paraffin or epoxy solution, which can be subsequently solidified
by cooling or polymerization.
Sectioning is the production of very thin slices from a tissue sample.
The tool used for sectioning is called a microtome (tom = to
cut, as in appendectomy). A microtome may be as simple as razor
blade, or it may be a complex machine costing several tens of thousands of
dollars (for producing the ultrathin sections needed for electron microscopy).
 Most laboratory microtomes have the essential machinery
of a baloney-slicer:
- a cutting edge (which may be a razor, a heavy knife,
a piece of broken glass, or a finely sharpened diamond),
- a specimen holder,
- a screw to advance the specimen toward the blade (ultramicrotomes
may use carefully-controlled thermal expansion in lieu of a screw),
- a crank, such that each turn of the crank raises the
specimen, advances it, and then lowers it across the blade.
- Historical note: Jan Purkinje (b. 1787)
is often credited with inventing the first practical microtome (but also see
here).
Sections for routine light microscopy are typically 5-10µm (micrometers,
microns) in thickness. Exceptionally thin sections may be less than 2µm
thick. For electron microscopy, sections are typically 50-100 nanometers
(millimicrons) in thickness.
Sectioning necessarily reduces the specimen to a two-dimensional
representation. Reconstructing the three-dimensional structure of
the original sample requires either the "stacking" of multiple
images from serial sections, or else judicious use of imagination (3-D visualization).
A very small amount of three-dimensional information may be directly
visualized under the microscope, by focussing up and down through the thickness
of the specimen.
For a further account of 3-D visualization, see here.
Artifacts of sectioning.

Among the commonest artifacts introduced by sectioning, and most distracting for
a beginner, are wrinkles. To appreciate why wrinkles form,
imagine trying to lay a sheet of wet tissue paper (representing the slice
from the sample) flat onto a table (representing the microscope slide).
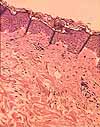
Even with great care, wrinkles sometimes appear. Sometimes wrinkles
are "forced" when the tissue section stretches or shrinks to differing degrees
in areas of varying consistency (as between epidermis and dermis in the image at right).
Another sectioning-related artifact is the disappearance
of small structures which fall out of their proper place on the specimen,
and the occasional reappearance of such structures at other inappropriate
locations. This happens most often when the process of slicing separates
a part which is attached only outside the plane of section, such as a hair
shaft within a hair follicle. Except in the case of perfect lengthwise
slices, the hair shaft will be cut into an oval slice that is not attached
to the sides of the hair follicle and may therefore come out (leaving the
follicle apparently empty) and then alight somewhere else (as an odd oval
structure anywhere on the slide).
Yet other common artifacts are scratches and "chatter."
- Scratches are caused by flaws or dirt on the cutting edge, and appear
as straight slashes or ragged tears across the specimen.
- "Chatter" is the visible record of knife vibration. The process of slicing
sometimes induces vibrations in the knife edge, which then cause variations
in thickness (ripples) in the section.
They are often most evident in areas of smooth texture, such as the colloid in
thyroid follicles. these appear as narrow
parallel bands, usually evenly spaced, across a tissue specimen.

Tissues which are poorly fixed or inadequately permeated by embedding medium may tear or crumble during sectioning,
as has happened to the lens seen in the thumbnail at right.
STAINING
 Most cells are essentially transparent, with little or no intrinsic pigment. Even
red blood cells, packed with hemoglobin, appear nearly colorless when unstained,
unless packed into thick masses. Stains are used to confer contrast,
to make tissue components visibly conspicuous. Certain special stains,
which bind selectively to particular components, may also be used to identify
those structures. But the essential function for staining is simply
to make structures easier to see.
NOTE that all stain color
is artifactual and does not represent the natural color of the tissue.
The same structures may have very different colors with different stains.
For example, collagen is pink with H&E
but blue or green with trichrome. You should
generally use specific aspects of actual structure (location, size, shape,
texture) to identify cells and tissues, rather than color. If used wisely, color can
offer additional information. But color by itself is unreliable.
TOP OF PAGE
 H&E
stain
A combination of hematoxylin and eosin, commonly referred to as H&E, is by far the most
widely used stain for routine histology.
Most micrographs displayed in this website illustrate tissue sections stained with H&E.
From such familiarity, H&E stained specimens can come to appear "normal." But please keep in mind that nuclei are not really purple and collagen
is not really pink. All such stain colors are artifacts,
albeit intentional ones.
Hematoxylin is
a basic stain with deep purple or blue color.
Structures that are preferentially stained by basic stains are described as basophilic
("base-loving"). Basophilic structures include chromatin (i.e., cell nuclei) and ribosomes.
With H&E staining, such basophilic structures are stained purple.
Hematoxylin generally does a good job of staining cell nuclei, and of suggesting where ribosomes
are especially plentiful. But given the opportunity (i.e., "overstaining," or
bleaching out of other stains), all material on a slide may acquire the color of hematoxylin.
Historical note: Hematoxylin is named
for a Mesoamerican logwood tree, a valuable trade item for Spanish galleons travelling from Yucatan
to Europe with cargo destined for manufacturing fabric dye (see "Hematoxylin ... Pirates' Most
Desired Treasure, and Irreplaceable Tissue Stain," Int. J. Surg. Pathol. 27:4-14 [2019]
DOI: 10.1177/1066896918787652).
Eosin is an acidic stain with a red color.
Structures preferentially stained by acid stains are described as acidophilic
(or eosinophilic) and include collagen fibers, red blood cells,
muscle filaments, mitochondria. With H&E staining,
acidophilic structures are stained red or pink.
Muscle and collagen can be similarly eosinophilic, hence the utility of a trichrome stain
when it is advantageous to notice collagen.
Historical note: Eosin is named for Eos, the
"rosy-fingered goddess of the dawn" in ancient Greek mythology.
NOTE: Both hematoxylin and eosin can potentially stain most cell structures, despite the
selectivity noted above. And stain can fade over time. Thus absolute color intensity
on H&E-stained slides can be quite variable, with the same cell structure appearing red
on one slide, pink on another, and possibly even blue on yet another.
Relative stain intensity on the same slide is a more reliable
indicator of acidophilic / basophilic quality than is absolute color, but
this can also vary, especially between edges and center of a specimen.
Acidic and basic stains do not behave like litmus paper, despite a certain
similarity in color. Basophilic cell structures are NOT necessarily
acidic; they only happen to stain with basic stains. Likewise for
acidophilic structures, which are NOT necessarily basic. Many
tissue staining properties defy simple analysis, being determined by the complex chemistry of
proteins and other macromolecules after interactions with fixatives and
other processing agents. Use H&E to help visualize cell structures, not
to provide any chemical information about cell contents.
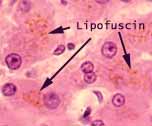
 If an H&E slide shows any colors other than purple/blue
and red/pink -- such as yellow or brown -- the additional color is probably
due to an intrinsic pigment such as melanin (e.g., in the pigmented epithelium of the eye)
or lipofuscin (e.g., in hepatocytes).
Some cell structures do not stain well with aqueous dyes and so routinely
appear clear. This is especially so for those which are hydrophobic,
containing fat. Included in this category are adipocytes, myelin around
axons, and cell membranes of the Golgi apparatus.
TOP OF PAGE
Trichrome stain


 Trichrome
uses three dyes (hence the name), including one that is specific for the extracellular
protein collagen. The principle use for trichrome is to differentiate
collagen from other eosinophilic structures, such as muscle fibers. Depending on the particular
stain combination, a trichrome stain may color collagen fibers sky-blue
or bright green.
Trichrome stains can be especially useful for highlighting an accumulation
of scar tissue, as in glomerulosclerosis of the kidney
or cirrhosis of the liver.
TOP OF PAGE
PAS stain
| PAS stain (Per-iodic Acid Schiff) is used for
glycogen, glycoproteins (such as mucus), and basement
membranes (which contain glycoprotein). |
|
TOP OF PAGE
Nissl stain
 The Nissl method (named for Franz Nissl,
b. 1860) is an historically important stain which facilitated the mapping of central nervous tissue, by accentuating nerve
cell bodies. The Nissl method uses toluidine blue, which
has an affinity for nucleic acids. It provides intense staining of rough endoplasmic reticulum, clumps of which characterize
nerve cell bodies where they were historically called Nissl bodies. The Nissl method was famously used by the
great neurohistologist, Ramón y Cajal, and was the initial basis
for Brodmann's map of regional differentiation of the
cerebral cortex.
 |
TOP OF PAGE
Other stains. Be aware that many other stain techniques exist,
for special cases. Some of these are classical procedures that can yield
beautiful results but depend on mysterious art and alchemy for success.
Other, more-modern techniques have been rationally designed to exploit recent
developments in molecular biology.
 In the "classic" category are a number of stains based on metal
salts.
A silver-based stain that demonstrates reticular
fibers and basement membranes
is especially useful for diagnosing certain pathologies of kidney
glomeruli.
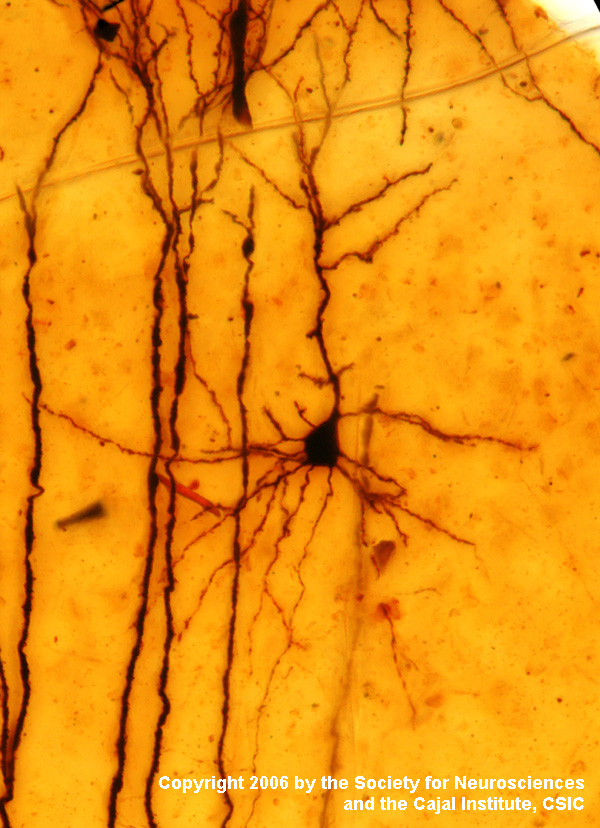
A variety of silver stains have been very powerful for
research into the central nervous system.
 Their only common feature
is that silver grains form a dark precipitate on selected structures, with
empirical variables determining which structures are visualized.
Notable here
is the Golgi stain developed by Camillo Golgi and
used to impressive effect by Ramón y Cajal.
Some cells have traditional names based on their demonstration
with certain stains, such as those cells of the gastrointestinal tract called "argentaffin cells" (cells with
an affinity for silver) and "chromaffin cells" (cells with an
affinity for chromium).


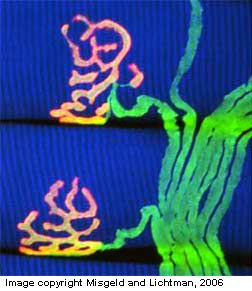
 In the "modern" category are molecular markers that can be tagged by radioactive labels, enzyme
reactions, or fluorescence of specific antigen binding, as in the examples at right. The techniques of autoradiography,
enzyme histochemistry and immunocytochemistry often require tissue
sections from frozen rather than chemically fixed tissue.
 Most laboratory microtomes have the essential machinery
of a baloney-slicer:


